Abstract Art Flower Painting Lesson

This abstract art flower painting lesson will walk you step by step through the process of painting a funky, colorful floral abstract painting in acrylics... like the one on the right!
Painting abstract flowers is fun and easy. It's basically a building process, where you paint shapes and patterns in different colors on top of each other and next to each other.
I've done several of these floral abstracts over the years, because they are just so fun and look so good when they're finished. Painting them is relaxing, almost meditative. And they turn out differently each time!

I've provided links below to the relevant products so that you can easily find them on Blick Art Materials and Amazon. As an affiliate I earn from qualifying purchases. This helps support this site and keeps it free of ads. Click here for more info.
Materials Needed
- Acrylic paints - I prefer Golden or Liquitex, but any brand of acrylics will do
- Paintbrushes - 1 flat paintbrush for painting the background squares, and 1 or 2 small round paintbrushes for painting in the details. I am personally a fan of the inexpensive Maestro Series XV Paint Brush Set.
- Canvas - choose a square or rectangular canvas in any size you want. I used a 12"x 12" canvas for this tutorial.
- Ruler - for measuring the grid
- Pencil - for drawing the grid

Before we get started, you might find it useful to see a quick visual overview of the process. Click here or click on the image to the right to view a larger version. Then come back here and read through the step by step instructions to create your own abstract art flower painting!
I used a 12 x 12 inch canvas for this abstract art flower painting tutorial, but you can use any size canvas you want - square or rectangular, small or large. I've done these floral abstract paintings on canvases as small as 6" x 6" and as large as 24" x 36".
First, prime your canvas by covering it with 1-2 coats of gesso. (If you're wondering "What is gesso and why is it important?" then click here to learn about gesso and how to prime your canvas with gesso.)
Once the gesso has dried, use your ruler and a pencil to draw a grid on your canvas. There are many possibilities here - your grid squares can be as small or as large as you like. For my 12 x 12 inch painting, I chose 3-inch squares (4 rows of 4 squares each).
I could have easily also done 4-inch squares (3 rows of 3 squares each) or 2-inch squares (6 rows of 6 squares each) or even 6-inch squares (2 rows of 2 squares each).

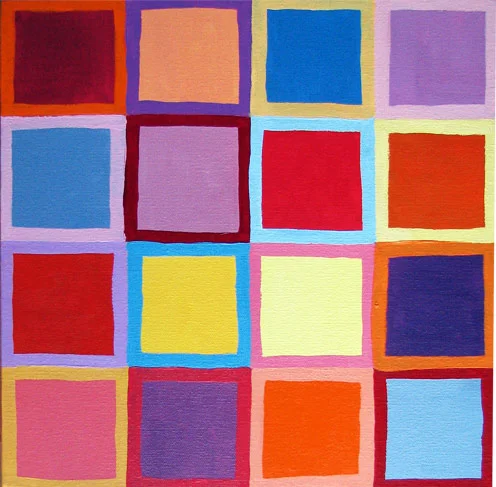
After you've drawn your grid, you're ready to paint! The first step is to paint each square a solid color. You can choose any colors you want. Here's how it looks when you're starting out:

As you can see, the squares don't have to be painted "perfectly". My edges are a bit wobbly, but that's okay. The edges will actually get painted over in the next step, which you'll see in a second.
When you paint in each square, try to think of how each color will look next to the other colors. With that said, in general don't worry too much about selecting the "right" colors because:
you can always paint over them if you need to, and
these squares are just the background.
You'll be painting different colors on top of these squares to make your flowers, so only a portion of these background colors will actually show through by the time you're finished.
Okay, enough jumping ahead! Let's get back to where you are now...
Here is how the painting will look with all the squares painted in:

Congrats - now your canvas is all covered in paint! That's an important first step. From here on out, you'll be adding detail to each square and making each one unique!
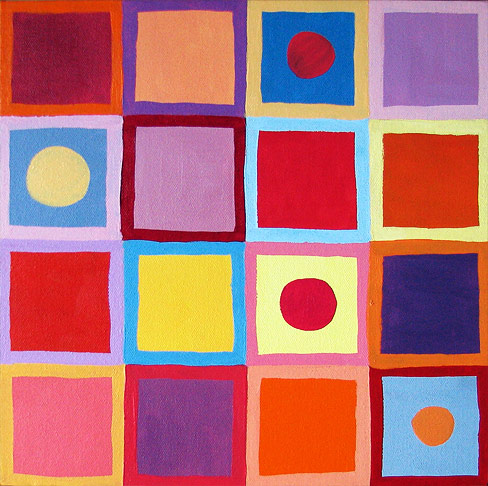
The next step is to paint a "border" inside each square, like so:

When you paint these borders, try to choose colors that go well with the background color of the square, and also goes well with neighboring colors.
Remember not to fret too much about choosing the "right" colors though, as I mentioned earlier. Just go with your gut feeling, and remember that the painting will look different by the time you're finished because you'll be adding a lot more detail.
Here is how the canvas looks after the borders have been painted inside each square:
Abstract Painting Squares
Next you'll be painting circles inside the squares, like so:
The circles can be any size and color you want. I find that painting a variety of sizes and colors creates a more interesting composition to work with. Here's how it looks when all the circles are painted in:
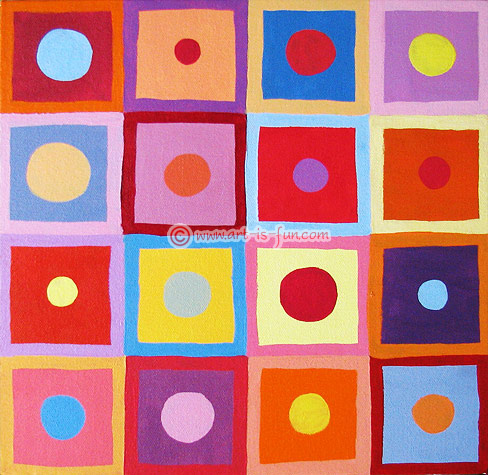
The painting is really starting to POP! isn't it?
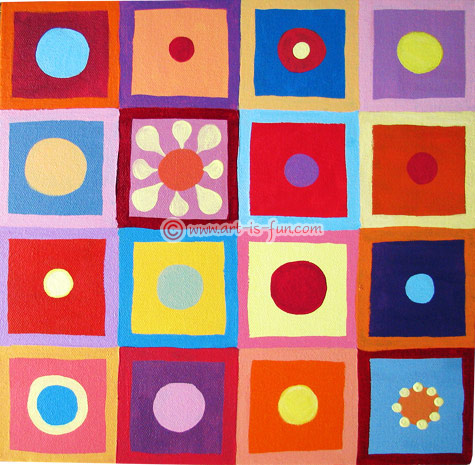
Now it's time to paint petals and other details around or on top of the circles. For example, examine the progress photo below, and notice how I added pale yellow in several places. I painted:
yellow petals around an orange circle,
a small yellow circle inside of a red circle,
several yellow dots in a ring around an orange circle, and
a yellow circular line around a light blue circle.
Compare the image below with the image above, if that helps make it easier to see the added details.
I find that it is easiest to choose one color, and then add several details using that same color, before moving onto the next color.
After adding the pale yellow details above, I added some orange details:

Next, I added pink and red details:

Remember, you can also paint details on top of the details.
Also, try to create a variety of petal shapes, like tear-drops, inverted tear-drops, swirls, loops, half-circles, pointy half-circles, etc.
Next I added some petals and other details in pale orange and magenta:
It's starting to look more and more finished, isn't it!
Next I added some blue petals and details:
Pink and yellow details were then added:

A few orange and yellow-orange details were added, and now the painting is nearly done!

At this point, I felt the painting was just about complete. It only needed one more thing... metallic paint! (buy on Blick: purchases support this site).
I like shiny, sparkly things, so I couldn't resist adding some metallic blue, copper and gold to each flower. It's a fun finishing touch that adds extra oomph to the painting.

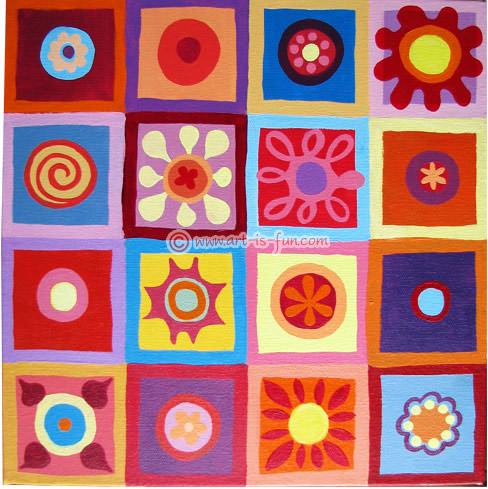
Voila! There's the finished abstract flower painting!
Knowing when the painting is "finished" is a very subjective thing, so go with your gut feeling. Some people like tons of detail while others prefer less detail, so try to find a balance in your painting that pleases you.
If you're not sure whether a painting is done or not, set it aside for a few days or a week, and then look at it again with fresh eyes. Sometimes all it takes is a short break for you to see the artwork anew!
For a quick visual refresher, take a look at this overview of the steps to create this abstract art flower painting, and then read on to find out what to do with the sides of the canvas. You'll also see examples of other abstract art flower paintings!

Now, there's just one last detail to take care of...
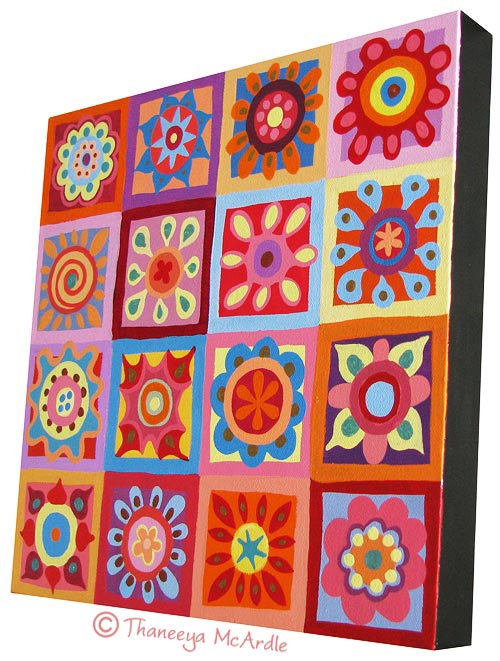
What to do with the sides of the canvas...?

When you paint, you're likely to get paint on the sides of the canvas, like you can see in the side view above. So what should you do with those unfinished edges?
I describe several options on what to do with the sides of your canvas here. Basically, you can either paint the sides a solid color, or paint them to match the front. I've done both!
For this painting, I decided to paint the edges black. I used a flat brush for this, and also painted very carefully, so as not to get any of the black paint on the front of the painting.
If you know in advance that you'll want to paint the sides black, a good idea is to paint the sides black before you even paint the front. It can be the next step after you gesso. That way, if you get any paint on the sides while you're painting the front, you can easily touch up the sides with dabs of black after you're done with the front. When you just do touch-ups, there less chance of accidentally getting the black paint on the front.
If you decide to paint the edges black, black gesso is a great option because it flows well and it is easy to apply. Because of the consistency of black gesso, I find it easier to use when painting the sides of a canvas, rather than regular black acrylic paint.
Another idea for the sides is to paint them to match the front. You can simply carry on the abstract art flower motif around to the edges.
Here is an example of one of my abstract art flower paintings that has sides painted to match the front:

I hope you enjoy this Abstract Art Flower Painting Lesson! As I mentioned earlier, one of the best things about painting abstract art flower paintings is that each one can be so different, depending on several factors, such as color choices and placement, designs, sizes, etc. Check out the examples below for inspiration!
Examples of Abstract Art Flower Paintings
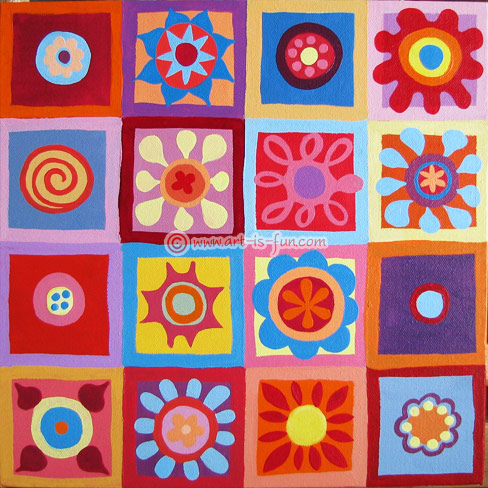
Here are some other abstract art flower paintings I've created in other sizes:

This is the front of the painting shown just above, with the sides painted to match the front. This was painted on a 7" x 7" canvas, with 1" squares.
I was first inspired to create these floral abstract acrylic paintings because of my love for Indian textiles from Rajasthan, with their detailed patterns and colorfully mesmerizing designs. I designed these abstract paintings to resemble a cross between these Indian textiles and other types of quilts. I was tickled when a professional quilt-maker made a quilt based on the above abstract art flower painting!

The painting above was painted on a 18" x 24" canvas, using 3" squares.

The 2 paintings above were painted on 9" x 12" wood panels, with 3" squares. Abstract art flower paintings look great when hung in pairs!

The painting above is another example of a 12" x 12" abstract art flower painting with 3" squares - the same dimensions used in this tutorial.
Selling or publicly displaying art based on this tutorial
This painting lesson shows you how I make abstract flower paintings in my signature style. Please read this important message if you want to publicly display or sell your paintings that you made based on this lesson. Thank you in advance!
Happy Painting!!

Click to return to the Abstract Art Table of Contents, where you can...


Rock Painting Tutorial
In my rock painting demo, you’ll learn step-by-step how to use Posca pens to paint colorful rock mandalas!


